Showing posts with label Workshop. Show all posts

Wednesday, May 26, 2010

Workshop 8

Workshop 8


Ruby on Rails Workshops Report and Evaluation

Topic objectives

Upon the completion of this workshop, developers or managers should be able to:
• Identify and evaluate the Ruby on Rails workshop series
• Think critically and analytically about what you knew before and after the experiences
• Share and post your Report and Evaluation with peers via the subject forum.


Evaluation and Report

Please answer each question in this evaluation section. In your answer, please consider content/topics presented and the technologies and teaching strategies used during the Ruby on Rails Workshops. Results will be collated and used to modify the workshop series.

This form is just a format guide to you evaluation and report. Thank you for your time to complete workshop 8.


1. List what you consider to be the three strengths of Ruby on Rails workshop series
  • A step by step approach for the student to understand and discovery Ruby on Rails features.
  • A lot of examples and resources links are given for reference which can speed up the learning process.
  • MVC concept is well-defined and explained in the workshops.

2. List what you consider to be the three weaknesses of Ruby on Rails workshop series:

  •  Some of the information is too old. (e.g. rhtml file structure)
  •  Procedures for RoR Configuration are missing. Student needs to spend a lot of time to figure out how to configure the correct environmental parameters (MySQL setup) and build the project.
  • A lot of typo mistake inside the workshop material

3. List what aspects of Ruby on Rails workshop series that you found to be most difficult.

The most difficult part is the workshop 6 as it involves a lot of programming skills which are not discuss in the earlier section. Even a lot of information is available online, but it is still difficult to find the correct one. If there is a particular reference material or Web for RoR programming then it will help the student a lot. We need to spend time on learning and practicing but not for searching.

4. List what improvements could be made to the Ruby on Rails workshop series:

  • Clear setup and configuration procedures
  • Better referencing materials


Free response and reflective questions:


5. Reflect on your experiences with the other Web framework used in this subject: Was it effective? How can it be improved? Should other Web frameworks be used as well or instead of Ruby on Rails?

From my point of view, RoR is easy to learn but difficult to drive. Versions are always change and it is not well-organised (Open source).

6. Did the Developer’s or IT managers Team that you joined after workshop 4 have a preference towards using other tools to facilitate collaboration? Comment on the differences between these use of the sub-forum or Interact wiki tools from your experiences in this subject.

For oversea student in Hong Kong, we still prefer to communicate face by face or by phone or email (fast responds) rather than doing Wiki or forum.

7. Further comments to add?

Workshop 7

DEVELOPER’S THREAD (RED team)

To Do:

Developers conclude their work with the OTBS and look at the options for deployment of the site. Examine the various platforms/software tools used for deployment such as UNIX environment suggested in the Discussion Notes, Mongrel or Mongrel cluster, Nginx, Subversion or Capistrano (during development stage), JRuby in the Java environment.

Which way?

The choice is up to you as this workshop present just one option and you may like to use another, such as deploying the OTBS in a .NET or J2EE environment

Deployment of a Web site depends on a lot of factors, RoR runs on most operating systems like linux, Mac, BSD and Windows and also from a wide range of web server configurations.


By accessing the rubyonrails.org site, it suggests several options, Passenger aka mod_rails, Proxy setups(Apache or nginx against Mongrels or Thins), JRuby on Rails (Glassfish or Jetty app server) and automate with Capistrano.


From my experience, Unix based system is more stable and secure than windows based system. Therefore, I will only consider Unix based system for the OTBS project. As OTBS is only a thin system, and Unix is good for big guy, Linux may be a better choice - open source and run on cheap computer hardware.


Mongrel is designed to server Ruby code, but it is not too suitable for static content like images, html, css or javascript. Therefore Mongrel should always deployed behind another webserver, like Apache (railhostinginfo, 2010). Apache with Mogrel will be the choice in the OTBS project.

According to rubyofrails.org, passenger is a very powerful deployment tool for RoR, it works well with Apache. It can be combined with Capistrano and taking the automated advantage (Modrails, 2010).

Moreover, Apache Subversion revision control system can be employ in the OTBS case, which can help to maintain the source code, web pages and documentation (Wikipedia, 2010)

A suggested deployment map is shown below: (Begin, 2008) 


Can you get the OTBS Running in production mode as a minimal production server?

Minimal production server is not only refer to the HW cost of the server but also the setup, upgrade, administration and maintenance cost of the OTBS project system. Our OTBS is running in the Linux mode with Apache and Mongrel, the HW server cost should be very low when compare with other operating system platform. Moreover, the SW tools that we are using are mostly open source (a lot of support documents available online) and is proven to work very well (easy to admin and maintenance) in this platform. I am  pretty sure to get the  OTBS running in production mode as a minimal production server.


Share your success by posting progress comments and links etc to the Developers sub-forum site that has been set up for the Red team.

Saturday, May 22, 2010

Workshop 6

DEVELOPER’S THREAD (RED team)

To Do:

Developers may continue to build upon work with the OTBS using the topic reading to help with user registration and advanced login features from Hartl et al (2008). Some examples of work to do includes:

o generating a controller and an action by adding a method(s) to a controller;
o creating a view template for each action and to link to actions from views;
o using AJAX to improve the user experience;

After browsing a lot of online materials, I will implement the REST programming (CRUD) concept in this user registration and advanced login features section for the OTBS systems.

New user registration, login, logout, edit user and unregister a user are handle in this login section.

Two models, Session and Person will be created. Session will authenticate a user by finding the username and password in the People table. Person model will encrypt every password with 256 bits SHA2 digestion accompanied with a unique salt. The layout and user experience will be my last consideration at this moment due to the time limitation.

Create two models by:

ruby script/generate resource session
ruby script/generate resource person


Edit the db/migrate/2010052603610_create_sessions.rb and db/migrate/20100526030647_create_people.rb to create the table in the OTBS database

Then execute rake db:migrate, an error occur due to a wrong version of libmySQL.dll. Download the correct version then the problem fixed. (take me 2 hours to figure out)


Configure the session and person model according to the specification. The username is 4-16 letters, numbers or underscores and has no space and password is 4-16 characters.

Configure the routes.rb to change to a new root_url path
map.root :controller => 'people'
delete the public/index.html file

Configure all the related controllers and views (application, session and people)

The screen captures are shown as follow:-

Home Screen


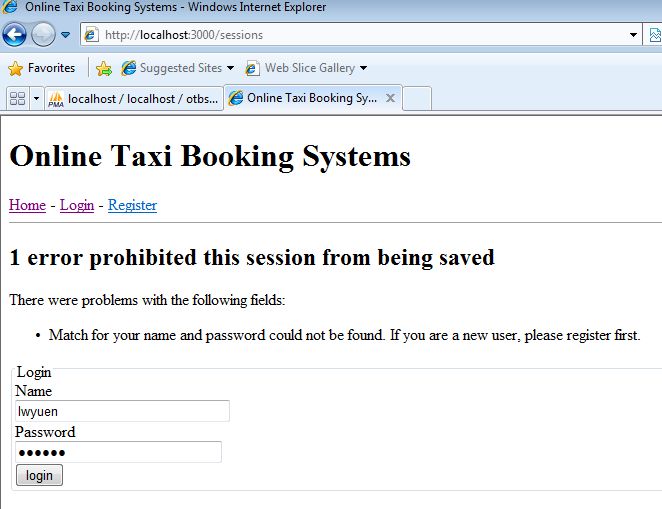
Log-in with a new user --> error message pop-up


Go to the register screen and enter the new username and password.


New user register successful (Welcome message) and change into the Taxi booking screen.


The people table is inserted a new user data with encrypted password and a salt.


Try to change the password by the Edit Account tab.


Password change successful.


Unregistered the lwyuen account and a warning message pop-up on the screen.


By answering OK, the account is unregistered.


If time is allowed, I will come back this workshop to add more features and with AJAX enhancement.

Share your success by posting progress comments and links etc to the Developers sub-forum site that has been set up for the Red team.

Friday, May 14, 2010

Workshop 5

DEVELOPER’S THREAD

To Do:


Part A: Viewing the action

1. Create the Rails application framework in the projects folder: C:\InstantRails\...\projects\>rails animals

Done. By using the command C:\Ruby\bin> ruby rails animals, the animals project have been created. A new folder animals is created under C:\Ruby\bin\ directory.

2. Running the application on localhost:3000 using the WeBrick ruby server (or Mongrel as alternative) and access via Web browser at http://localhost:3000/

Done. By using the command C:\Ruby\bin\animals>ruby script/server, the ruby server is up and running and the result is shown as below.


3. Create the controller to make the application do an action. This is under the controller-action/model-view structure.

Stop the WEBrick server each time you edit Ruby classes and then re-start or refresh the views you are testing. Use the Ruby command below:

>ruby script/generate controller Mammal

The mammal_controller.rb contains just a bare class description:

class MammalController< ApplicationController

end

and the ApplicationController class inherits from ActionController::Base class in the ActionController module under Rails.

Successful. Result shown below:

4. Test the controller by starting the WEBrick server and navaigatibng the browser to http://localhost:3000/mammal Note how the controller name is appended to the end of the URL and that no action resulted because there are no controller methods.

Done. Result as below.


5. Create an action by editing and saving the mammal_controller.rb class in projects\animals\app\controllers using your text editor to add the method below:

class MammalController< ApplicationController

def breathe
end
end

Done.

6. Start the WEBrick server and browse at http://localhost:3000/mammals/breathe where you will get a “missing template” message since it is missing a view for the breathe method.

Rails is trying to connect the breathe method action of the mammal controller to a view, by using the action’s name – breathe. This view template is created as breathe.rhtml and stored in the \projects\animals\views\mammal directory.

The command has a typo mistake. The correct command should be http://localhost:3000/mammal/breathe

Command Executed. Output as below:


7. Create and save a view in that directory by using a text editor to create a view called breathe.rhtml


Restart the WEBrick server and browse again at http://localhost:3000/mammals/breathe

View added under animals\app\views\mammal. Execution result shown as below:


8. Try Ruby code and HTML in the action view by using the wrapper around the inserted Ruby code. Here are some snippets to try from workshop 4:


NOTE: in practise you normally perform calculations in the action (method) and pass the results to the view.

By editing a try_ruby_code.rhtml file under animals\app\views\mammal and restart the ruby server. The result is shown below:


Part B: The active view: passing data from an action too a view


1. Create a new application called scenery in the same projects directory to demonstrate the use of an active view.

> rails scenery
> cd scenery

Done.

2. Create a controller called Demo in scenery\app\controllers

scenery> ruby script/generate controller Demo

Done.
3. Add an action to demo_controller.rb as the method called rubycobe


class DemoController< ApplicationController
   def rubycode
   end
end

Done.

4. Add a view template - scenery\app\views\demo\rubycode.rhtml

We will edit this view in later steps but you may like to add your own test HTML code to the view at this stage.

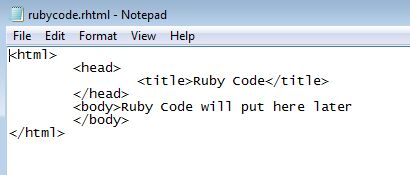
Done. Rubycode.rhtml is listed below.


5. Save and restart the Web server and navigate to http://localhost:3000/scenery/rubycode

Done. The execution result is shown below:


6. Use the Time.now example to pass data from an action to a view.

Done. The file and result is shown below.


7. Modify and save the rubycode action with a value for the time instance variable in the DemoController class in app\controllers\demo_controller.rb

class DemoController< ApplicationController
        def rubycode
        @time_now = Time.now
        end
end

Done.

8. Then modify and save the corresponding view template in \app\views\demo\rubycode.rhtml by adding a call by reference to the action’s instance variable:


Done. The @time.now is not correct, I need to change it into @time_now instead. The code is patching into the rubycode.rhtml file.

9. Restart the Web server and navigate the browser to http://localhost:3000/demo/rubycode

Data has been passed from the action to the view as it is done with SQL requests. The instance variables of a Ruby class are available to view templates by referencing the action’s instance variables by name in the view .rhtml template.

Done. The execution result listed below:


Part C: Screen layouts and forms processing with text fields, check boxes, radio buttons and multiple list controls


1. Create a new application called cabs in the same projects directory to demonstrate the use of an active view.

> rails cabs
> cd cabs

Successful.

2. Create a controller called Vehicle in cabs\app\controllers

cabs> ruby script/generate controller Vehicle

Successful.

3. Add an action to vehicle_controller.rb as the method called cabtype

class VehicleController< ApplicationController
       def cabtype
       end
end

Done.


4. Add a view template - cabs\app\views\vehicle\cabtype.rhtml

We will edit this view in later steps but you may like to add your own test HTML code to the view at this stage.

Done.

5. Save the view and restart the Web server and navigate to http://localhost:3000/cabs/cabtype

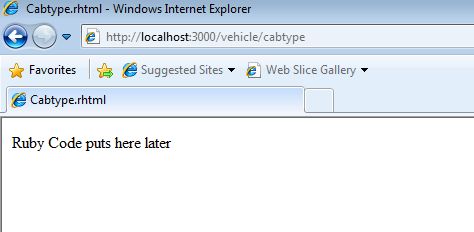
Before it can browse to the web page, I need to modify the database.yml file to point to the MySQL DB server and of course the MySQL server needs to be up and running. Moreover, the link is incorrect, the correct one should be http://localhost:3000/vehicle/cabtype

The results is as follows:-


6. Create a file in the public directory - \cabs\public called input.html


Created as request.


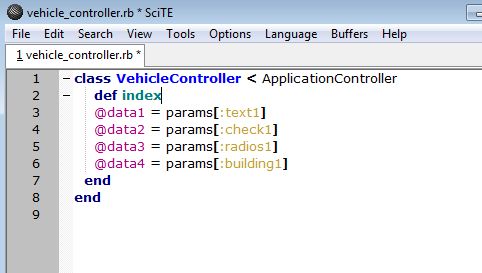
7. Edit the vehicle_controller.rb here is a start. The data in each form element in the Rails application can be accessed via its name and a hash called params

class VehicleController< ApplicationController


        def cabtype
        @data1 = params[:text1]
        @data2 = params[:check1]
        @data3 = params[:radios1]
        @data4 = params[:building1]
end
end

Updated as request.

8. Edit the view template cabtype.rhtml


Updated as request. But when I try to run this document, there is a syntax Error pop up as below.


After investigation, there are syntax errors in line 14-16. The file is changed as below:


Re-run the document, the expected result is shown as below:

9. Start the Web server and go to the opening page of this application at


I have put in the data as follow:


10. Submit the forms data. What do you find?


After submit the forms data, the IE holds up for a while. Then an error screen pop up:


This is an ActionController:: InvalidAuthenticityToken error. By pressing the Full Trace hyperlink, I have getting more information.


This is a request_forgery_protection.rb error and by finding in the Internet, there are two solutions:

1. Adding "protect_from_forgery :only => [:create, :delete, :update]"
into the vehicle_controller.rb (Ryan, 2007)
2. Adding "config.action_controller.allow_forgery_protection = false"
 into the development.rb (Rubyonrails.org 2010)

Re-run the input.html, another error is pop up as follow:


The system is trying to find "index.html.erb" file, so this error message is popup. Therefore I am changing the cabtype.rhtm into index.html.erb. Re-run the input.html, the result is as follow:


The final screen is appear but there is no parameter passing from the form. By investigating the server debug screen below, I find that the system is looking for the index inside the Vehicle_Controller.rb.


Therefore, I change the "def cabtype" into "def index" inside the vehicle_controller.rb.


Restart the system and re-run the whole process, the final result is finally show up.


How it works


When you use the params method in Rails, it implements the details of the parameter hash to be changed without breaking existing code. For example, the params hash for radios1 will contain the value of the radio button and the data is extracted in the cabtype action. With the multiple list box example in Rails, using the select controls, the params hash of building1 is an associative array (dictionary) holding the users multiple selections and is not just a drop-down list.


Rails supports other HTML controls for forms processing via text fields, check boxes, radio buttons and list select controls etc. As an example start_form_tag abd stop_form_tag as well as methods for each item such as the create field method text_field_tag


11. Report your progress or findings in your Developers Blog.

Reported in details above.

Tuesday, April 20, 2010

Workshop 4

Riding the Rails with Ruby

To do:


1. Spend some time moving your way through the 46 Ruby coding examples in the Ruby Tutorial with Code from http://www.fincher.org/tips/Languages/Ruby/

Done.


2. What are the syntax differences in the way that Ruby and Javascript use the if statement?

Ruby if statement syntax is:
if condition
   code to be executed if condition is true
end

Javascript if statement syntax is:
if (condition)
{ code to be executed if condition is true}

It is very obvious that Ruby is lose in syntax rule than Javascript. Javascript needs to have brackets for the condition and the code,  Ruby doesn't need any brackets for condition and the code but only needs a "end" keyword to close the if statement loop.


3. While Ruby and Python are quite similar, can you find some similarities between Ruby and Javascript?

First of all, Ruby and Javascript are object-oriented programming languages therefore "everyone can modify the class structure". Secondly, function can be passed as a parameter in both Ruby (code blocks) and Javascript. Thirdly, it is easy to check if an object can do something in both JavaScript (object function check) and Ruby (respond_to) (Dan, 2007)


Recommended time: 1-4 hours, but it may take several trial attempts so be patient with initial success.


Challenge Problems:


1. Create, test and debug a Ruby program called dognames.rb or catnames.rb to accept 3 names from the keyboard and to display each name on the screen in alphabetical order WITHOUT using a data structure such as a list.

The required dognames ruby coding is as follow:


This program will only accept lower case name because upper case name will always at the top of the alphabetical order. That means a mix of lower case and upper case names will produce a false result. Due to the names input from the gets command will contains a carriage return, it will affect the display result, I have use the gets.chomp command to input the names so the data will only contain the name. The output of this program will produce a very nice single line of names rather than a 3 different lines with a single name. The output is as below:


2. Write a Ruby program called fizzbuzz.rb that prints the numbers from 1 to 100. But for multiples of three print "Fizz" instead of the number and for the multiples of five print "Buzz". For numbers which are multiples of both three and five print "FizzBuzz".

The fizzbuzz.rb coding is listed below:


I am using a "for loop" to generate the number from 1 to 100 and divide each number by 3 and 5. The program will identify what the remainder is and decide to display the number, Fizz, Buzz or FizzBuzz. In order to give a more clear result, I have added a additional condition which will start a new line after display ten numbers. Therefore, the running result shown below will be 10 lines with 10 numbers on it.


3. Compare the Ruby and Python versions of the dog years calculator:

#!/usr/bin/ruby

# The Dog year calculator program called dogyears.rb

def dogyears

# get the original age
puts “Enter your age (in human years): "
age = gets # gets is a method for input from keyboard
puts # is a method or operator for screen output

#do some range checking, then print result

if age < 0

puts "Negative age?!? I don't think so."
elsif age < 3 or age > 110
puts "Frankly, I don't believe you."

else
puts "That's", age*7, "in dog years."
end

dogyears


Python

#!/usr/bin/python
# The Dog year calculator program called dogyears.py

def dogyears():
# get the original age
age = input("Enter your age (in human years): ")
print # print a blank line

# do some range checking, then print result

if age < 0:
print "Negative age?!? I don't think so."
elif age < 3 or age > 110:
print "Frankly, I don't believe you."

else:
print "That's", age*7, "in dog years."
### pause for Return key (so window doesn't disappear)

raw_input('press Return>')

def main():
dogyears()
main()


The main differences are :-

1. Python needs to have a program main body (def main ()) which ruby doesn't need.
2. Ruby uses "gets" to input the data , but python uses "input" to get the data.
3. The if loop structure is similar but the keyword has a little bit different for the case of else if. Ruby use "elsif" but python use "elif".
4.  Ruby uses "puts" to display data , python uses "print" to display data.

Monday, April 19, 2010

Workshop 3

Online Taxi Booking System: MySQL and Database design


Topic objectives

• Develop a database object design for an online taxi booking system (OTBS);
• Revise database techniques with Rails and SQL
• Describe how to use the MVC “push-based architecture” in the Ruby on Rails development environment

Topic readings

Various websites as listed.

Discussion

1. Introduction

Beginning with a single model, single view and single controller classes will assist with development of the OTBS and its SQL database design. Developed and tested on your local computer using Ruby on rails and browser before migration to the production site.

In the Rails environment, applications are developed in the MVC pattern in a DRY (Don’t Repeat Yourself) manner with a strategy of CoC (Conventions over Configuration) and the whole Rails framework gives you the locus of control plus access to class and utility libraries where the:

Model is ActiveRecord as Class ActiveRecord::Base to work SQL tables.
View is ActionView template files Class ActionView::Base
Controller is ActionController

In the previous workshop you were asked to consider the OTBS as our project vehicle for learning about Ruby on Rails as a Web application framework as well as examine the directories where Rails is located. By now you should also have looked at many online tutorials and videos about developing a simple database application with Ruby on Rails.

2. HelloWorld application in Ruby on Rails

Consider any discussion on how the Hello World application is made, as described by Armando Fox at the UC Berkeley RAD lab’s Ruby on Rails Short course at http://youtube.com/watch?v=LADHwoN2LMM.
In the Hello World application there is NO model, just a single controller called hello_controller.rb with only two controller methods and the view. Each controller method has its corresponding view, which can be called in a URL.

3. The SQL Model and Rails

In order to simplify our project we have combined the two tables (passenger_origin and passenger_destination), into a single table called passengers for these workshops. Now each table row will represent an object instance and each of the twelve (12) columns is an object attribute.

The simplest database operations are often described as CRUD (Create, Read, Update and Destroy). In a single table MVC example there are three main steps with you MySQL tool are:

1. Design the passenger model and attributes;

2. Instantiate the model with a database table and Ruby code

3. Develop a basic controller to do CRUD operations on the Passenger model objects.

If the simplified data model for our project is called Passenger (it is convention to name the model beginning with an upper case letter). The model is then a Ruby class located in app/models/passenger.rb. The SQL table is passengers – the pluralisation of the model.

The controller methods live in app/controllers/passenger_controller.rb

Each controller can access templates to display the input screen and methods for action.

The views are kept is app/views/passenger/*.rhtml, where each *.rhtml maps to a controller method. In Rails, the view is rendered using Ruby-generated RHTML or RXML.

4. More clues on the OTBS database design

OTBS called passenger has a single table called passengers as below:

passengers

name, contact_number, suburb_origin, street, street_number, building, (Unit, house or business) suburb_destination, passenger_number, (1 to 4) taxi_type (sedan, wagon, disabled, maxi), date, time_required

The SQL model is based on the SELECT, PROJECT, JOIN principles of relational databases, with a twist that we now think in terms of a database object via Ruby classes. Let us revise how the four CRUD operations are handled with SQL.

CREATE INSERT INTO passengers
(name, job_id, contact_number, suburb_origin, street, street_number, building, suburb_destination, passenger_number, taxi_type, date, time_required)

VALUES {“Sherlock”, 32832, “0078699”, “Kowloon”, “Baker St”, “42”, “Unit”, “Hawke Bay”, “3”, “wagon”, “2009-01-01”, “0730”}

{“Watson”, 32833, “1234456”, “Pinewood”, “Elm St”, “71”, “Business”, “Hawke Bay”, “1”, “sedan”,”2009-01-01”, “0730”}

READ SELECT * FROM passengers

WHERE (time_required = “0730”

UPDATE UPDATE passengers

SET date = “2009-01-02”

WHERE (name = “Watson”)

DESTROY DELETE FROM passengers WHERE contact-number = “0078699”

Review what was described earlier that the Model is ActiveRecord as Class ActiveRecord::Base to work SQL tables; View is ActionView template files Class ActionView::Base and the Controller is ActionController.

Thus the SQL model becomes a Rails ActiveRecord model and this is a major component of Rails in storing SQL tables and commands which can also be manipulated by collection of Ruby objects. When using SQL JOIN later with other tables, this process is called an object relationship graph abstraction.

5. Scaffolding and the concept of metaprogramming: doing more with less

Scaffolding is a key process during rapid prototyping of your Ruby on Rails project. It uses “metaprogramming” to generate a set of controller methods for the CRUD operations. After defining your model, its attributes and creation of the database table, the basic controller may be called passenger_controller.rb. which can use the scaffold command to release a set of methods to list, show, edit and destroy the database object.

Where do the views come from? Like the old days of “bare bones” programming, scaffolding provides a default set of “undecorated rhtml templates as the views.

There are two ways to scaffold with a simple controller: inline or by passing the model name to a script which can override controller methods and views inside the scripts folder in Rails.

This occurs due to a technique called metaprogramming to create the controller methods which call the method that renders the generic views which can be overridden by later template designs or new SQL schema versions using the Rails migration folder. The scaffold rendering methods in metaprogramming will respect any existing rhtml templates.

In summary try to remember that:

• Rails scaffolding via CoC is a common model of a Web front end to CRUD operations on database objects for a business application;

• Rails uses ActiveRecord database abstraction classes to work with SQL tables, beginng with a class called ActiveRecord::Base

• Metaprogramming creates scaffolding by mapping between instance methods and table columns (attributes)

• Scaffolding gets your application started quickly (rapid prototyping) then you can selectively replace it with later versions;

6. MySQL tools

Many GUI tools exist to support MySQL, such as MySQL Administrator, Migration kit and Query browser (http://www.mysql.com/products/tools/) for Windows, MacOS and Linux. CocoaMySQL is an application used to manage MySQL databases for MacOS users (http://cocoamysql.sourceforge.net/).

At one stage we will have to deal with migration of your prototype to the production site. To get a glimpse of that process in action, see the short screencast at http://www.mysql.com/products/tools/migration-toolkit/tutorials/migrate-sql-server.html


To do:

1. Set up the MySQL tools on your computer as described in section 6 above.

I am using the phpMyAdmin as the MySQL tools on my computer.

2. Rails will setup a new application directory for each of your Web application projects. Get InstantRails (Windows) or Locomotive (MacOS) running on your machine. Both packages install Ruby, Rails, a Web server or one called ‘Mongrel’ or another small Ruby Web server called ‘WEBrick’, and MySQL “inside a bubble” as I call it so that others parts of your system are not modified (Similarly ZOPE does with installing its own Web server and Python versions).

As described in Exercise 5, I am using the XAMPP 1.7.3 for the MySQL, Apache and the phpMyAdmin tools. Moreover, I have download the one-click windows installer "ruby186.27_rc2.exe" from the rubyforge.org which included the Ruby, popular extensions, editor and RubyGems. Afterward, I have setup the Ruby rails by the command "ruby gem install rails --include-dependencies" and morever update the whole system by "ruby gem update --system".

3. Once Rails is running you at http://localhost:3000, you need to configure database access. Connection to the database is specified in the config/database.yml file.

I have created a project call test by "ruby rails test". Then I use the command "ruby rails test -d mysql to change the database.yml file configuration. The content of the database.yml and the localhost:3000 screen are as follow:


4. Generate the Passenger model by creating the MySQL database and ‘passengers’ table from the information above.

I had created the passengers table from the otbs databse and insert two passengers according to the data mention in section 4.


Create the model by running the "ruby script/generate model Passenger" and the controller by "ruby Script/generate controller Passenger". A passenger.rb file is created under the "app/models" directory and a passenger_controller file is created under the "app/controllers" directory accordingly.


5. Further work on understanding MySQL under Rails by David Mertz:

a. See “Fast-track your Web apps with Ruby on Rails” at http://www-128.ibm.com/developerworks/linux/library/l-rubyrails/

Done.

b. The “Rolling with Ruby on Rails” series and “Cookbook recipes by Curt Hibbs and others beginning at http://www.onlamp.com/pub/a/onlamp/2005/01/20/rails.html

Done.